In fact, you might like to get a few friends together one night a week and all have a go together. It might be the beginning of a very dynamic art group!

Getting a taste
Start by getting familiar with the machine working with the feed dogs down. Begin with normal tensions to get an idea and to compare the feel of the top tension loosened.

It reminds me of the work of Cathy Cullis. There is the simplicity of line in a primitive sort of way. Marianne is talking of whole streets of houses! Sounds good!
Once you become confident with the patterns on the calico, move onto enhancing printed fabric with stitch. Make patterns in and around the printed motifs.
This shows Tansy's practicing and then moving onto the printed fabric.


Something new to try 5 weeks in a row
writing/drawing


cords and edges

water soluble

fabric manipulation


'Shrink texturing'

Working into a 'broomsticked' piece of fabric. Twist a piece of damp cloth very tightly till it turns right back on itself and leave it to dry for a week.


Have a go with a bubble texture technique.
Try it on shiny fabrics (a pain to do and really should be left to dry before fusing) and on cotton. Very effective when using velvet!
Take a cooling rack, damp fabric and poke it into the holes of the grid.
Hold onto it and check the bubbles are as you like on the other side.


This was done with an awesome velvet print which made the most gorgeous bubble texture. and really, if it hadn't had the awesome print, it wouldn't have looked as stunning at the end.


Here is a photo of the bubble texture with cotton. Above it is Maria's work with fine fabrics and water soluble film.

If you want to take Machine Embroidery further in your own work use the techniques to develop your own motifs and ideas.
Delia made a "tile" for each technique. The fabric here didn't shrink as much as she wanted, but she has worked into it and is still turning it into something interesting.

Kate tried different things to reproduce the look of wind carved bricks on Lindesfarne.

Improvisation and Development
It is exciting to see how you could take techniques and do things further to them on their own.
Here is a happy rescue. One lady tried the texture on the cooling rack with a black velvet the week before. However, you need to dampen the fabric so it clings into the grid a bit better...and well...the black velvet bled. While she and I were rescuing the cover of the table top ironing board, Delia spied the interfacing and saw the potential (before I could snap it up!). Look how she has worked into it!

Heather made a wonderfully bright sampler of bobbinwork.

She went back to previous experiments. Here she couched strips of fabric down onto her broomsticked fabric... eventually adding green stems for a lovely abstract bouquet.

Some other fun stuff going on.


Stitch on paper and metal
Some painted paper trimmings I had were just right for having a go.

And pages an old Brazilian dictionary.


Interesting results on the back because paper doesn't play like fabric when it comes to tensions.

some stitch on metal

Some combined things, including stitch on mylar(space blanket).

Using heat tools
A bit of stitching


and then a bit of zapping with a heat gun
and look!


And then to top it off...
a bit of judicious mark making going on (drawing with a soldering iron)


Image Transfer
Try a few different transfer media - I have tried one I got some time ago from one of those free catalogues you get through the door. also Dylon transfer medium, and Mod Podge. You can stitch into it later.
One technique for drying that I learned when I did my City and Guilds in college. Instead of drying the image with the medium on it, you lay it onto the fabric and rub it in. Then you layer it with baking parchment and press it with an iron on wool setting. you should also turn the piece over and press as well. The heat dries/cures the transfer medium and you can proceed with the bit about getting the paper wet and rubbing it off.
Here is a bit of what went on.
Applying the medium


Using techniques in your work
More of Kate's work on a piece inspired by a wall on Lindisfarne. She is going to insert little pieces inspired by the 'carpet pages' in the Book of Kells.


More of Delia's little embroidered 'tiles' inspired by images of Medieval tiles.

Some of Gaynor's work on a piece which evokes the feel of the sand and the sea through a Maori symbol.

Heather's work on a piece inspired by a design set into the pavement in Slough town centre.

Here Leslie is auditioning a feathered fabric which can be used as 'hair' for the women in her Klimpt inspired piece.

Photos at the end of 15 weeks meeting one night a week.


 Some of Delia's tiles
Tansy's cloth book pages coming along!

 Gaynor's complete work
Jenny's experiments

 Maria's samples and work for her project.
 Ask someone else to come see the work and give feedback. This gives people a chance to discuss the work with someone apart from the group leader! and to see that others thought their work was special as well!
I really enjoyed working with these adventurous ladies! Looking forward to seeing results of finished designs.
---
Kate has posted me a photo of her final piece. In the end, she decided it was just the thing to finish off a lovely revolving book rack her late husband had made her!

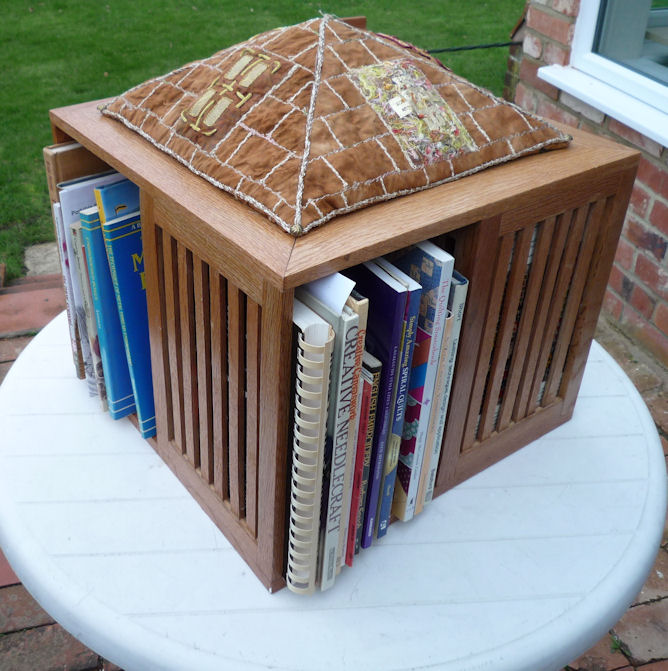

She is right!
No comments:
Post a Comment